Showing posts with label after. Show all posts

October 9, 2013

One Year Update ~ Front Yard

 
Moving on with our "where things are at after one year" posts, the weather was beautiful this past weekend so it only made sense to spend as much time as we could outside getting things cleaned up and ready for fall.
 
I would say that the outside of the bungalow has gone through the biggest transformation to date. We have been building buildings and weeding like crazy. We still have a ton of work to do and some pretty exciting plans for the future but for now things are definitely looking a lot tidier.
 
To recap....below is how the front of the property looked about a month before we moved in. The random fence panel still makes me giggle.
 

FRONT YARD ~ BEFORE


And the next three photos were taken the day we were given the keys. You can definitely see a difference in neglect. Clearly the previous owners weren't too concerned about the property after they had finally sold it. The broken garbage can is a nice touch.


FRONT YARD ~ PROGRESS


And this is how the front of the bungalow looks now. Happier and healthier I would say.
 
We are finally getting a handle on the weeds out front. They are still scattered through out the lawn and in the grass close to the road but they are far more manageable now. We so far have cleaned up the front porch, re-painted the number sign, chucked the screen door and moved the mailbox to the side.
 
We dug out all of the stumps left from the hedging and grass seeded along the front. Planted Mr. Roboto last October and cleaned up the front flower beds. Recently we built a vegetable garden and re-painted the shed.
 
Probably the biggest change is the new garage you see poking out behind the left side of the bungalow. The garage will have it's own post which should be making an appearance soon.


I took these recent photos just as the sun was setting. Our shadows in the photo above add a bit charm I think ;)


The chain link fence still stands but I have been itching for months to rip that thing out. I believe the time is nye. I have been dreaming of a new fence for a long time and I am probably going to be more excited the necessary when I am finally given the green light to make it happen. For now I will continue weeding the empty flower bed. We haven't planted anything here yet because when the fence goes this goes as well.
 
 
To back up the bus even further than the month before we took possession and the day we got the keys, below is how the bungalow looked from the street when we first viewed the property.
 
What bungalow you ask?
 
The property started out almost fully surrounded by the hedges. The bungalow couldn't be seen from the road unless you stopped to catch a glimpse over the random fence panel. It was entombed in it's own little hedge fortress. Naturally it made the property feel really private when inside and I was initially devastated when we were told the alleged news that the City ordered the front hedges to come down. The neighbours took the hedges down between the two properties a little while before hand. I did get over it and realized that the bungalow gets so much more natural light now and can now stand proud as a member of the street after being hidden for so many years.


Photos taken from Google Maps.
 
The funny thing is I remember driving by the house on numerous occasions when we were out looking at other properties in the area, seeing the For Sale signs and wondering what the house looked like behind the hedge. It wasn't until our Realtor sent us the listing that I put two and two together and the rest is history! 


March 11, 2013

Stripping Doors ~ Bringing Back The Wood

I am trying to ignore the blatant fact that I haven't written a blog post in over 3 months! I apologize greatly to all those that are actually interested in what goes on around 9808. It hasn't been for lack of nothing getting done though. Things have definitely been moving and shaking...so much so that I have failed to find time to blog about it. Oh well, enough excuses!

One project came to be a few weeks ago as I was sitting on the couch one evening pondering what I should tackle in the half an hour of spare time I had. I was facing the door down to the basement and thought, "maybe I will chuck a coat of white paint on that door quick"....

I already knew  the job was going to take longer than half an hour but I could definitely give it a once over with the sandpaper to prep it for paint. It shouldn't take that long right?...


Little did I know what I would find once I started the "quick sand" process! We already knew that the previous owners had literally slapped a coat of paint on every paintable surface when the house was up for sale. They even painted things that weren't meant to be painted such as all of the original hardware. Some people, I tell ya.

As I started my light sand, the first layer of paint began peeling away in chunks, so naturally it all had to come off. After sanding a little deeper I discovered that the door looked like it had been originally stained. This caused huge excitement on my part! After yelling at D to come look, he was pretty excited as well at the prospect of stripping the doors back to their original state.
  

So we went to work peeling off the top coat of white paint with razor blades and then taking the door downstairs to our basement turned project room to tackle the remaining layers.


Peeling the first layer of paint off was the easy part and quite fun I must say. The older original layers were not as easy and I wouldn't say I had that much fun either. We started out by using the sander and then, which seemed like hours later, resorted to using paint stripper. Much easier and definitely more rewarding.


I was worried that the aircraft paint stripper we had on hand was going to damage the wood but it worked out fine. No we don't own an aircraft or have ever stripped the paint off an aircraft! D uses it on vehicles and parts etc.
 

After finally getting the door back down to bare wood (I believe it took us about 2 evenings worth of work), we applied 3 coats of English Walnut wood stain and 2 coats of sealer. D did one coat of stain per evening, giving it 24 hours to dry between coats. The entire project took about a week to complete. I should also mention that was only one side of the door. We were in a hurry to get it back up and admire our handiwork ;)


We also stripped the paint off all the hardware and freshened them up with a couple of coats of spray paint.


D and I are super happy with the results. Though it does now emphasize how much the floors need to be redone. One day....

Bonus: A sneak peek at our newly "minted" front door! The hardware still needs a coat of paint over there also.


We still need to clean things up a bit more and um paint the screw heads as well. As I said, we were impatient to get the door rehung ;)

Of course if we do one door then naturally we need to redo all of the interior doors. Needless to say we are going on 2 weeks without a bedroom door! 


December 31, 2012

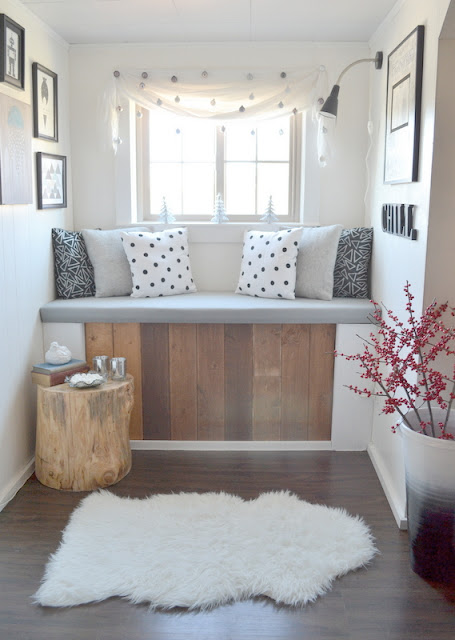
Window Seat ~ Reveal!


Yesterday was a beautiful winter's day. The unexpected sun was a lovely surprise and a perfect opportunity to finally take some photos of the finished window seat at the top of our stairs. There are still are few things I would like to tweak but for now I am happy with the outcome. It's cosy and relaxing and at the moment decorated for the winter season.


I picked up the red berries from my favourite garden store down the road a few days before Christmas. Their days are numbered but they still add a pretty winter colour to the neutral palette. The clay planter has been kicking around in storage for a while. I spray painted the bottom half gloss black and the top half white to achieve an ombre effect.


The cushions are all made from material collected from thrift stores. I should have ironed the fabric first but patience when working on a project isn't always my strong suit. Oh well. The black reading lamp is from Ikea and the little silver trees are from the Dollar Store. The curtain is an old Ikea sheer panel and the silver balls are left overs from a Christmas wedding I decorated last December. 


I am not overly excited about this art piece. My vision was definitely in a different direction. But true to my nature I tried to fix a mistake by adding more and this is what I ended up with. The owls are a wallpaper sample I had ordered online from a supplier in the UK (still trying to track down the company in my email). I was initially thinking of using the wallpaper to line the back of a shelving unit but you had to order a whole roll so the cost would have been too high in the end. The words are the title of one of my favourite children's books growing up. I do like how the effect on the matte resembles birch bark though. I may definitely revisit this project in the future.....we will see.

The black wooden letters are from Walmart. 


The faux sheepskin rug is from Ikea and the grey material covering the bench is also a thrift store find.


All the art on the left wall is DIY'ed. I have posted about the crayon art and the hockey tape art here and here. The other pieces will get their few minutes in the spotlight hopefully in time.


I have to say my pride and joy in this area is definitely the tree stump side table. I had snagged the stump from my Dad's wood pile last summer and left it in the basement to dry out for a few months. It was covered in thick bark and moss but I saw it's potential right away. It was love at first site. Actually I grabbed two stumps and am hoping to make another side table for the family room in the future. The second stump has a special characteristic so stay tuned.

After this stump had dried out I took a hammer and chisel to it and spent a couple of hours removing the bark as best I could. Then I spent a few more hours sanding it down. The wood was quite soft and sanded easier than I expected. Finally I sealed it with two coats of semi gloss wood sealer.


The two vintage books belonged to my Mum. The silver tea light holders are a Dollar Store find. The white ceramic bird is one of a pair I found at the thrift store a few years ago, along with the grey glass ashtray turned candy dish.


I love the colour variations and imperfections in the tree stump.


Apart from the accessories and decor, we also painted the old ugly wood panelling in this area white, caulked around the window and gave it a fresh coat of paint, repaired the ceiling tiles with dry wall filler and painted them a light grey, found the ceiling light cover in the shed, and finally added moulding around the ceiling. 

Eventually, along with the rest of the house, we will be tearing all of the wood panelling and crappy drywall out, starting from fresh with new drywall and redo this area properly. But for now with a little elbow grease and a few bucks, it's definitely a huge improvement!

Total Cost for this little update:

Reading Light - Ikea = $11.99
Faux Sheepskin Rug - Ikea = $12.99
Tree Stump - Dad's garden = Free
Cushion/Window Seat materials - Thrift stores = Less than $20 total
Cushion inserts - Reused from old cushions around the house = FREE
Window Seat Foam - The Foam Shop = $46
Clay Planter - Reused = FREE
Silver Xmas Trees - Dollar Store = $1 each ($3)
Silver Xmas Balls - Reused = FREE
White Ceramic Bird - Thrift Store = $4.99/pair
Grey Glass Ashtray - Thrift Store = $3.99
Silver Tealight Holders - Dollar Store = $1.50 each ($3)
Canvas' and Picture Frames - Dollar Store/Walmart = Less than $20 total
White Sheer Curtain - Reused = FREE
Black Wooden Letters - Walmart = $1.99 each ($10)
Paint for walls and ceiling - Had on hand from other projects around the house

Total Cost = Approx. $135.00! Not bad for a functional and attractive little nook.

And just as another reminder of what this space started out as....