Showing posts with label window seat. Show all posts

December 31, 2012

Window Seat ~ Reveal!


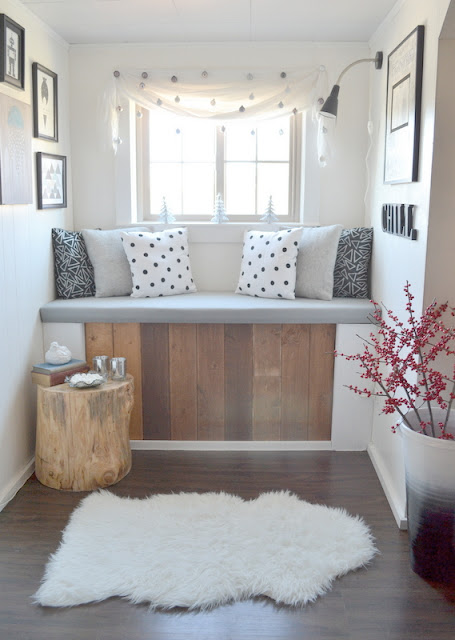
Yesterday was a beautiful winter's day. The unexpected sun was a lovely surprise and a perfect opportunity to finally take some photos of the finished window seat at the top of our stairs. There are still are few things I would like to tweak but for now I am happy with the outcome. It's cosy and relaxing and at the moment decorated for the winter season.


I picked up the red berries from my favourite garden store down the road a few days before Christmas. Their days are numbered but they still add a pretty winter colour to the neutral palette. The clay planter has been kicking around in storage for a while. I spray painted the bottom half gloss black and the top half white to achieve an ombre effect.


The cushions are all made from material collected from thrift stores. I should have ironed the fabric first but patience when working on a project isn't always my strong suit. Oh well. The black reading lamp is from Ikea and the little silver trees are from the Dollar Store. The curtain is an old Ikea sheer panel and the silver balls are left overs from a Christmas wedding I decorated last December. 


I am not overly excited about this art piece. My vision was definitely in a different direction. But true to my nature I tried to fix a mistake by adding more and this is what I ended up with. The owls are a wallpaper sample I had ordered online from a supplier in the UK (still trying to track down the company in my email). I was initially thinking of using the wallpaper to line the back of a shelving unit but you had to order a whole roll so the cost would have been too high in the end. The words are the title of one of my favourite children's books growing up. I do like how the effect on the matte resembles birch bark though. I may definitely revisit this project in the future.....we will see.

The black wooden letters are from Walmart. 


The faux sheepskin rug is from Ikea and the grey material covering the bench is also a thrift store find.


All the art on the left wall is DIY'ed. I have posted about the crayon art and the hockey tape art here and here. The other pieces will get their few minutes in the spotlight hopefully in time.


I have to say my pride and joy in this area is definitely the tree stump side table. I had snagged the stump from my Dad's wood pile last summer and left it in the basement to dry out for a few months. It was covered in thick bark and moss but I saw it's potential right away. It was love at first site. Actually I grabbed two stumps and am hoping to make another side table for the family room in the future. The second stump has a special characteristic so stay tuned.

After this stump had dried out I took a hammer and chisel to it and spent a couple of hours removing the bark as best I could. Then I spent a few more hours sanding it down. The wood was quite soft and sanded easier than I expected. Finally I sealed it with two coats of semi gloss wood sealer.


The two vintage books belonged to my Mum. The silver tea light holders are a Dollar Store find. The white ceramic bird is one of a pair I found at the thrift store a few years ago, along with the grey glass ashtray turned candy dish.


I love the colour variations and imperfections in the tree stump.


Apart from the accessories and decor, we also painted the old ugly wood panelling in this area white, caulked around the window and gave it a fresh coat of paint, repaired the ceiling tiles with dry wall filler and painted them a light grey, found the ceiling light cover in the shed, and finally added moulding around the ceiling. 

Eventually, along with the rest of the house, we will be tearing all of the wood panelling and crappy drywall out, starting from fresh with new drywall and redo this area properly. But for now with a little elbow grease and a few bucks, it's definitely a huge improvement!

Total Cost for this little update:

Reading Light - Ikea = $11.99
Faux Sheepskin Rug - Ikea = $12.99
Tree Stump - Dad's garden = Free
Cushion/Window Seat materials - Thrift stores = Less than $20 total
Cushion inserts - Reused from old cushions around the house = FREE
Window Seat Foam - The Foam Shop = $46
Clay Planter - Reused = FREE
Silver Xmas Trees - Dollar Store = $1 each ($3)
Silver Xmas Balls - Reused = FREE
White Ceramic Bird - Thrift Store = $4.99/pair
Grey Glass Ashtray - Thrift Store = $3.99
Silver Tealight Holders - Dollar Store = $1.50 each ($3)
Canvas' and Picture Frames - Dollar Store/Walmart = Less than $20 total
White Sheer Curtain - Reused = FREE
Black Wooden Letters - Walmart = $1.99 each ($10)
Paint for walls and ceiling - Had on hand from other projects around the house

Total Cost = Approx. $135.00! Not bad for a functional and attractive little nook.

And just as another reminder of what this space started out as....


November 21, 2012

Overdue Update~Saturdays In November

It's been just over a month since I have shared anything here at 9808. Gah time travels so fast!!

That is not to say nothing has been getting done on the home front though.

One of the reasons for the sound of crickets around here is I was really starting to get frustrated with our current little point and shoot camera and my photography skills (or lack there of I should say). With winter approaching and the days getting shorter our time spent at home during daylight hours has been becoming less and less. The weekends now seem to be the only time to attempt to take half decent photos. 

D works on Saturdays so the day has become my time to get up early and spend the 8 hours alone tackling small projects around the house. I get so involved with what I'm doing, it's usually by the end of the day after dark that I realize I forgot to take any photos to show you what has been going on. Sundays are then spent working on house projects together and then of course forgetting to document the progress once again. 

So I used the above as an excuse to buy a new Nikon SLR! Makes sense right? We used to have an older model Nikon so we just went with what we were already comfortable with. What it really does is motivates me to spend the time to take better quality photos of our bungalow progress and also forces me to take the time and learn to use the camera and its functions properly. 

With that all said, here are a mix of a few things that have been happening on Saturdays around here this past month. 

This adorable owl planter was picked up from the thrift store for $3.99. He was a pretty hideous yellow colour and has a small chip on his left foot. I primed him and then gave him a couple of coats of white spray paint. Now he is proudly sporting a full head of greenery on our stereo cabinet in the dining room.


Started to paint the main floor. First up was the hallway. The colour is Raindrops by CIL.


Made wooden stars out of recycled wood from the random fence panel that used to be in the front yard. More on this later.


Decorated for the fall season.


And continued working on the window seat area. There is still work to be done. Things need to be moved around, the window bench needs to be upholstered with the grey fabric, and  more art needs to be hung on the walls, but this definitely gives you an idea of the final outcome.


And a before photo.....


More updates coming soon!

September 28, 2012

Inspiration ~ Window Seat

This weekend is going to be a whirlwind of last minute cleaning, repairing and organizing. We hand in our keys at the townhouse and the shop on Sunday and we still have things to get rid of at both places.

I'm not going to have time to do any more work on this mini makeover so I thought I would post some inspiration photos for our window seat area in the meantime to give you an idea of what's to come.


Source List: Left to Right 

September 24, 2012

Weekends, Weeds & Window Seats

I had mentioned on Friday that D and I would be putting the finishing touches on a small project over the weekend but alas it wasn't meant to be. The project was to give our front porch a mini makeover and one of the final steps was to repaint the concrete steps. D works on Saturdays so I set out to Home Depot bright and early to buy what was needed. The stairs do need to be repaired at the bottom so we didn't want to spend a lot of time and money going through all of the proper steps to refinish the porch at this time...stripping, acid washing, cleaning, sealing, painting, sealing again. We just wanted to quickly slap some paint on them to give the porch a fresher look until we paint the exterior of the house next year.

So after convincing the salesperson at Home Depot that we didn't want to spend a fortune and yes we knew that they wouldn't hold up for the long haul, she recommended we use a product called 'Restore'. It goes on thick and covers all of the imperfections in the concrete. You do still need to use the 'Restore' cleaner beforehand though and then wait 24 hours before applying the paint. Reducing the steps from 6 to 2 and only needing to buy 2 products instead of 5 definitely seemed much more manageable.

The salesperson also warned that the paint needed to be applied when no rain was expected for at least 48 hours. Driving home the sky was clouding over and the air felt damp. By the time I had gathered up the necessary tools I realized that painting the stairs or at least cleaning them just wasn't in the cards for the day. To be honest I had also starting losing interest and becoming a little disheartened in the project on the drive back form Home Depot.

All is not lost, I started on a different mini makeover indoors that seemed much more enjoyable than scrapping and cleaning concrete steps. But as to not leave you in the lurch on the outside mini makeover, here is a pic of the work that has been done to the front of our bungalow so far.


So far we have:
  • Removed the screen door.
  • Repainted the house number and hung it higher.
  • Painted the mail box black and fixed it to the side railing.
  • Hung some fall hanging baskets.
  • Removed the weeds from along the front.
 We still need to:
  • Repaint the concrete steps.
  • Plant some greenery along the front and add river rocks as a border.
  • Put new trim around the front door.
  • Maybe paint the door handle (still in discussion).
  • Add a couple more fall planters to the porch.
It doesn't seem like much but when you compare it to the before pic it's quite an improvement.


Pulling out the weeds along the front was a tough job. Firstly because they were 60% thistles and secondly because the ground was as hard as cement. D's sister and mum very kindly worked on the left side the day we moved in and D finished off both sides, broke up the soil and leveled it off last week.

Speaking of weeding...D and I spent all of Sunday afternoon pulling out the weeds (again mostly thistles) along the front of the property line in front of the chain link fence where the front hedges used to be. I don't have any photos of this part of the yard, but trust me it was pretty horrible looking.

Back to the indoor project that was started on over the weekend.....it's soon to be my favorite seat in the house....Yep the window seat :)

Here is a before photo as a reminder.


The wood paneling was covered in scratches, marks and quite frankly looked ugly. Too much wood paneling gives me a headache. So I started out by sanding it down and painting it white.


Such a huge improvement already. I will keep you posted on the progress of this little space that brings me so much joy. Or at least it will when it's done ;)