Showing posts with label before. Show all posts

October 9, 2013

One Year Update ~ Front Yard

 
Moving on with our "where things are at after one year" posts, the weather was beautiful this past weekend so it only made sense to spend as much time as we could outside getting things cleaned up and ready for fall.
 
I would say that the outside of the bungalow has gone through the biggest transformation to date. We have been building buildings and weeding like crazy. We still have a ton of work to do and some pretty exciting plans for the future but for now things are definitely looking a lot tidier.
 
To recap....below is how the front of the property looked about a month before we moved in. The random fence panel still makes me giggle.
 

FRONT YARD ~ BEFORE


And the next three photos were taken the day we were given the keys. You can definitely see a difference in neglect. Clearly the previous owners weren't too concerned about the property after they had finally sold it. The broken garbage can is a nice touch.


FRONT YARD ~ PROGRESS


And this is how the front of the bungalow looks now. Happier and healthier I would say.
 
We are finally getting a handle on the weeds out front. They are still scattered through out the lawn and in the grass close to the road but they are far more manageable now. We so far have cleaned up the front porch, re-painted the number sign, chucked the screen door and moved the mailbox to the side.
 
We dug out all of the stumps left from the hedging and grass seeded along the front. Planted Mr. Roboto last October and cleaned up the front flower beds. Recently we built a vegetable garden and re-painted the shed.
 
Probably the biggest change is the new garage you see poking out behind the left side of the bungalow. The garage will have it's own post which should be making an appearance soon.


I took these recent photos just as the sun was setting. Our shadows in the photo above add a bit charm I think ;)


The chain link fence still stands but I have been itching for months to rip that thing out. I believe the time is nye. I have been dreaming of a new fence for a long time and I am probably going to be more excited the necessary when I am finally given the green light to make it happen. For now I will continue weeding the empty flower bed. We haven't planted anything here yet because when the fence goes this goes as well.
 
 
To back up the bus even further than the month before we took possession and the day we got the keys, below is how the bungalow looked from the street when we first viewed the property.
 
What bungalow you ask?
 
The property started out almost fully surrounded by the hedges. The bungalow couldn't be seen from the road unless you stopped to catch a glimpse over the random fence panel. It was entombed in it's own little hedge fortress. Naturally it made the property feel really private when inside and I was initially devastated when we were told the alleged news that the City ordered the front hedges to come down. The neighbours took the hedges down between the two properties a little while before hand. I did get over it and realized that the bungalow gets so much more natural light now and can now stand proud as a member of the street after being hidden for so many years.


Photos taken from Google Maps.
 
The funny thing is I remember driving by the house on numerous occasions when we were out looking at other properties in the area, seeing the For Sale signs and wondering what the house looked like behind the hedge. It wasn't until our Realtor sent us the listing that I put two and two together and the rest is history! 


September 30, 2013

One Year ~ Wow, Time Flies!

So as I'm sure you have noticed things have been quiet around these parts lately. It's definitely time to shoo away the crickets, roll up the sleeves and dust the cobwebs off this blog. I could list a bunch of excuses for the silence but mostly summer happened and my attention was drawn more to spending time outside, focusing on my sport and generally not thinking about updating you all on the house in word form.

That doesn't mean nothing has been getting done around the bungalow though. We finally have another free standing building on our property, YAY, and we have been spending loads of one on one time fighting the weeds in our garden and generally trying to make the yard look more presentable. I finally feel like we are winning the war with the weeds but the battle definitely isn't over yet.

With the changing of seasons, we also roll over into our second year of home ownership. D and I  celebrated our one year 'house-iversary' at the beginning of this month with a happy one year text and a high five. I felt it was only right to show the bungalow some respect by doing some general cleaning once we got home after work as well.

One year seems like the perfect time to do a little recap of the bungalow and to show what has changed (and what hasn't changed) over the past year. Our initial phase one goal of our bungalow reno was to make the home feel more like us as well as making it bright and cozy.

So without further ado, I present to you the main floor. Before photos from the day we were given the keys to progress photos of last weekend.

KITCHEN ~ BEFORE


KITCHEN ~ PROGRESS

The kitchen definitely makes me happy now and was the first room we tackled. Actually we re-painted the cabinets before we officially moved in. That was after we spent a solid weekend scrubbing the grime off of everything. Instead of bothering with the fridge, we just threw it out and replaced it with a smaller version D already had at the old shop.


We painted the walls a soft grey, the light fixture black as well as the back door to the deck. I made curtains for the windows, under the sink and the storage closet. Painted the window and door surrounds white and re-sprayed the cabinet hardware. I also found some tile decals online to cover up the ugly randomly placed fruit tiles. We added moulding under the cabinets and cleaned up and spray painted the hood fan and vent.

We still need to fix the wall behind the fridge and missing moulding around the ceiling. But for now it's a great improvement.


BATHROOM ~ BEFORE


BATHROOM ~ PROGRESS

The bathroom we have done, um......nothing. Other than added a few accessories that is. This is the first room on our total demo list. Very much looking forward to it. We have great plans but it being the only bathroom in the house is going to make it a little tricky.


BEDROOM ~ BEFORE


BEDROOM ~ PROGRESS

Nothing much has changed in the bedroom. It's funny how priorities change after living in a house for a while. I remember when we viewed the bungalow I was very concerned about a small hole in one of the ceiling tiles. I thought it would haunt me and now I don't even notice it.  

We bought ourselves our first grown up bed last Christmas and ten months later the box spring is still in the plastic. Not something I'm proud of but that is life. This room has also fallen victim to having random accessories thrown in with no real purpose.  I made the wooden tree last year from scrap pieces of fencing and hung Xmas decorations from it over the holidays. It's one of my favorite decor pieces.


Please note that this is what the bedroom looked like LAST weekend. This past weekend it received a much needed make over. Or at least the beginning of a makeover. 
 

DINING ROOM ~ BEFORE


DINING ROOM ~ PROGRESS

I actually don't mind the look of the dining room from before. Now though it is more cohesive to the rest of the bungalow. We painted the walls a mostly white grey, cleaned up the glass door to the kitchen and raised the curtain rod.


I have had plans to replace the ceiling fan for a while now but still nothing. I'm also hoping to make a custom wooden dining table one day as well. 


FRONT ROOM ~ BEFORE


FRONT ROOM ~ PROGRESS

I haven't posted many, if any, photos of the front room until now because quite honestly I am ashamed of our couches. Don't get me wrong, no offence to the couches themselves. They are extremely comfy and they have served us well for years, and my daughter's grandparents years before that. The problem is I have been meaning to re-upholster them for a very long time now. I have set goals and then let them all pass me by. First it was before we moved, then it was before last Christmas, now I would love to get them done before this Christmas but I'm not putting a lot of weight on that.
 
If you have never been invited over to the bungalow, it is honestly because I haven't re-upholstered the couches yet. True Story!


Now that the truth is out back to what we have done so far. We continued the grey white paint throughout the front room and hallway. Hung the water ski shelves, raised the curtain rod and painted the front door mint. Nothing in this room is a permanent fixture but more of a place holder for other things floating around my mind.
 
Also I am proud (not) to note that the frames around the room are still filled with decor I used for my sister's wedding shower back in the spring. At least they add some bright colour to the room.


HALLWAY ~ BEFORE

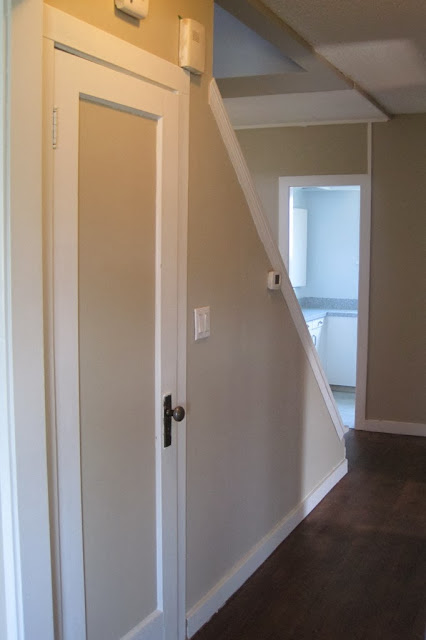
One of the favorite things D and I have done so far was stripping and re-staining the doors in the hallway. I can still remember the excitement of sanding off the layers of paint to discover the natural wood underneath. It was fun times and hopefully we will find some more treasures along the way.


HALLWAY ~ PROGRESS

 
The wooden stars are were also made from an old fence panel. I love that they are a good transition from holiday decor to regular decor. All season if you will, which works out great for those of us on the lazy side.


Up next, the yard, garage and the top floor. First I need to clean up the mess and pull some more weeds!


March 11, 2013

Stripping Doors ~ Bringing Back The Wood

I am trying to ignore the blatant fact that I haven't written a blog post in over 3 months! I apologize greatly to all those that are actually interested in what goes on around 9808. It hasn't been for lack of nothing getting done though. Things have definitely been moving and shaking...so much so that I have failed to find time to blog about it. Oh well, enough excuses!

One project came to be a few weeks ago as I was sitting on the couch one evening pondering what I should tackle in the half an hour of spare time I had. I was facing the door down to the basement and thought, "maybe I will chuck a coat of white paint on that door quick"....

I already knew  the job was going to take longer than half an hour but I could definitely give it a once over with the sandpaper to prep it for paint. It shouldn't take that long right?...


Little did I know what I would find once I started the "quick sand" process! We already knew that the previous owners had literally slapped a coat of paint on every paintable surface when the house was up for sale. They even painted things that weren't meant to be painted such as all of the original hardware. Some people, I tell ya.

As I started my light sand, the first layer of paint began peeling away in chunks, so naturally it all had to come off. After sanding a little deeper I discovered that the door looked like it had been originally stained. This caused huge excitement on my part! After yelling at D to come look, he was pretty excited as well at the prospect of stripping the doors back to their original state.
  

So we went to work peeling off the top coat of white paint with razor blades and then taking the door downstairs to our basement turned project room to tackle the remaining layers.


Peeling the first layer of paint off was the easy part and quite fun I must say. The older original layers were not as easy and I wouldn't say I had that much fun either. We started out by using the sander and then, which seemed like hours later, resorted to using paint stripper. Much easier and definitely more rewarding.


I was worried that the aircraft paint stripper we had on hand was going to damage the wood but it worked out fine. No we don't own an aircraft or have ever stripped the paint off an aircraft! D uses it on vehicles and parts etc.
 

After finally getting the door back down to bare wood (I believe it took us about 2 evenings worth of work), we applied 3 coats of English Walnut wood stain and 2 coats of sealer. D did one coat of stain per evening, giving it 24 hours to dry between coats. The entire project took about a week to complete. I should also mention that was only one side of the door. We were in a hurry to get it back up and admire our handiwork ;)


We also stripped the paint off all the hardware and freshened them up with a couple of coats of spray paint.


D and I are super happy with the results. Though it does now emphasize how much the floors need to be redone. One day....

Bonus: A sneak peek at our newly "minted" front door! The hardware still needs a coat of paint over there also.


We still need to clean things up a bit more and um paint the screw heads as well. As I said, we were impatient to get the door rehung ;)

Of course if we do one door then naturally we need to redo all of the interior doors. Needless to say we are going on 2 weeks without a bedroom door!