Showing posts with label renovations. Show all posts

March 11, 2013

Stripping Doors ~ Bringing Back The Wood

I am trying to ignore the blatant fact that I haven't written a blog post in over 3 months! I apologize greatly to all those that are actually interested in what goes on around 9808. It hasn't been for lack of nothing getting done though. Things have definitely been moving and shaking...so much so that I have failed to find time to blog about it. Oh well, enough excuses!

One project came to be a few weeks ago as I was sitting on the couch one evening pondering what I should tackle in the half an hour of spare time I had. I was facing the door down to the basement and thought, "maybe I will chuck a coat of white paint on that door quick"....

I already knew  the job was going to take longer than half an hour but I could definitely give it a once over with the sandpaper to prep it for paint. It shouldn't take that long right?...


Little did I know what I would find once I started the "quick sand" process! We already knew that the previous owners had literally slapped a coat of paint on every paintable surface when the house was up for sale. They even painted things that weren't meant to be painted such as all of the original hardware. Some people, I tell ya.

As I started my light sand, the first layer of paint began peeling away in chunks, so naturally it all had to come off. After sanding a little deeper I discovered that the door looked like it had been originally stained. This caused huge excitement on my part! After yelling at D to come look, he was pretty excited as well at the prospect of stripping the doors back to their original state.
  

So we went to work peeling off the top coat of white paint with razor blades and then taking the door downstairs to our basement turned project room to tackle the remaining layers.


Peeling the first layer of paint off was the easy part and quite fun I must say. The older original layers were not as easy and I wouldn't say I had that much fun either. We started out by using the sander and then, which seemed like hours later, resorted to using paint stripper. Much easier and definitely more rewarding.


I was worried that the aircraft paint stripper we had on hand was going to damage the wood but it worked out fine. No we don't own an aircraft or have ever stripped the paint off an aircraft! D uses it on vehicles and parts etc.
 

After finally getting the door back down to bare wood (I believe it took us about 2 evenings worth of work), we applied 3 coats of English Walnut wood stain and 2 coats of sealer. D did one coat of stain per evening, giving it 24 hours to dry between coats. The entire project took about a week to complete. I should also mention that was only one side of the door. We were in a hurry to get it back up and admire our handiwork ;)


We also stripped the paint off all the hardware and freshened them up with a couple of coats of spray paint.


D and I are super happy with the results. Though it does now emphasize how much the floors need to be redone. One day....

Bonus: A sneak peek at our newly "minted" front door! The hardware still needs a coat of paint over there also.


We still need to clean things up a bit more and um paint the screw heads as well. As I said, we were impatient to get the door rehung ;)

Of course if we do one door then naturally we need to redo all of the interior doors. Needless to say we are going on 2 weeks without a bedroom door! 


November 21, 2012

Overdue Update~Saturdays In November

It's been just over a month since I have shared anything here at 9808. Gah time travels so fast!!

That is not to say nothing has been getting done on the home front though.

One of the reasons for the sound of crickets around here is I was really starting to get frustrated with our current little point and shoot camera and my photography skills (or lack there of I should say). With winter approaching and the days getting shorter our time spent at home during daylight hours has been becoming less and less. The weekends now seem to be the only time to attempt to take half decent photos. 

D works on Saturdays so the day has become my time to get up early and spend the 8 hours alone tackling small projects around the house. I get so involved with what I'm doing, it's usually by the end of the day after dark that I realize I forgot to take any photos to show you what has been going on. Sundays are then spent working on house projects together and then of course forgetting to document the progress once again. 

So I used the above as an excuse to buy a new Nikon SLR! Makes sense right? We used to have an older model Nikon so we just went with what we were already comfortable with. What it really does is motivates me to spend the time to take better quality photos of our bungalow progress and also forces me to take the time and learn to use the camera and its functions properly. 

With that all said, here are a mix of a few things that have been happening on Saturdays around here this past month. 

This adorable owl planter was picked up from the thrift store for $3.99. He was a pretty hideous yellow colour and has a small chip on his left foot. I primed him and then gave him a couple of coats of white spray paint. Now he is proudly sporting a full head of greenery on our stereo cabinet in the dining room.


Started to paint the main floor. First up was the hallway. The colour is Raindrops by CIL.


Made wooden stars out of recycled wood from the random fence panel that used to be in the front yard. More on this later.


Decorated for the fall season.


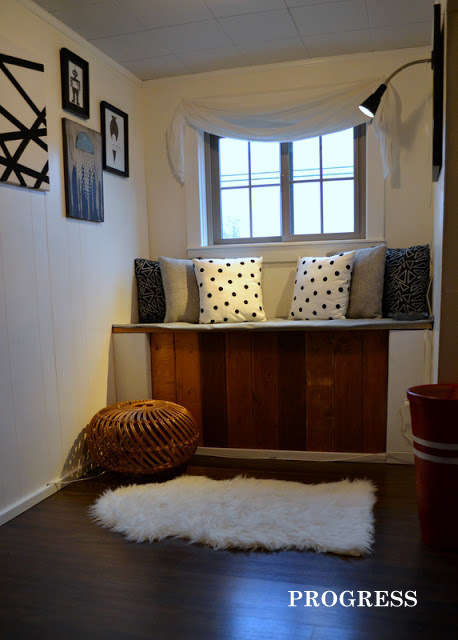
And continued working on the window seat area. There is still work to be done. Things need to be moved around, the window bench needs to be upholstered with the grey fabric, and  more art needs to be hung on the walls, but this definitely gives you an idea of the final outcome.


And a before photo.....


More updates coming soon!

September 24, 2012

Weekends, Weeds & Window Seats

I had mentioned on Friday that D and I would be putting the finishing touches on a small project over the weekend but alas it wasn't meant to be. The project was to give our front porch a mini makeover and one of the final steps was to repaint the concrete steps. D works on Saturdays so I set out to Home Depot bright and early to buy what was needed. The stairs do need to be repaired at the bottom so we didn't want to spend a lot of time and money going through all of the proper steps to refinish the porch at this time...stripping, acid washing, cleaning, sealing, painting, sealing again. We just wanted to quickly slap some paint on them to give the porch a fresher look until we paint the exterior of the house next year.

So after convincing the salesperson at Home Depot that we didn't want to spend a fortune and yes we knew that they wouldn't hold up for the long haul, she recommended we use a product called 'Restore'. It goes on thick and covers all of the imperfections in the concrete. You do still need to use the 'Restore' cleaner beforehand though and then wait 24 hours before applying the paint. Reducing the steps from 6 to 2 and only needing to buy 2 products instead of 5 definitely seemed much more manageable.

The salesperson also warned that the paint needed to be applied when no rain was expected for at least 48 hours. Driving home the sky was clouding over and the air felt damp. By the time I had gathered up the necessary tools I realized that painting the stairs or at least cleaning them just wasn't in the cards for the day. To be honest I had also starting losing interest and becoming a little disheartened in the project on the drive back form Home Depot.

All is not lost, I started on a different mini makeover indoors that seemed much more enjoyable than scrapping and cleaning concrete steps. But as to not leave you in the lurch on the outside mini makeover, here is a pic of the work that has been done to the front of our bungalow so far.


So far we have:
  • Removed the screen door.
  • Repainted the house number and hung it higher.
  • Painted the mail box black and fixed it to the side railing.
  • Hung some fall hanging baskets.
  • Removed the weeds from along the front.
 We still need to:
  • Repaint the concrete steps.
  • Plant some greenery along the front and add river rocks as a border.
  • Put new trim around the front door.
  • Maybe paint the door handle (still in discussion).
  • Add a couple more fall planters to the porch.
It doesn't seem like much but when you compare it to the before pic it's quite an improvement.


Pulling out the weeds along the front was a tough job. Firstly because they were 60% thistles and secondly because the ground was as hard as cement. D's sister and mum very kindly worked on the left side the day we moved in and D finished off both sides, broke up the soil and leveled it off last week.

Speaking of weeding...D and I spent all of Sunday afternoon pulling out the weeds (again mostly thistles) along the front of the property line in front of the chain link fence where the front hedges used to be. I don't have any photos of this part of the yard, but trust me it was pretty horrible looking.

Back to the indoor project that was started on over the weekend.....it's soon to be my favorite seat in the house....Yep the window seat :)

Here is a before photo as a reminder.


The wood paneling was covered in scratches, marks and quite frankly looked ugly. Too much wood paneling gives me a headache. So I started out by sanding it down and painting it white.


Such a huge improvement already. I will keep you posted on the progress of this little space that brings me so much joy. Or at least it will when it's done ;)

September 14, 2012

Kicked To The Curb

Then taken out back and shot to the dump!
Here's a quick run down of what we ripped out and evicted from 9808 last week.

Day One

  • The carpet leading to the basement. I didn't even want to walk on this thing in shoes it was so gross and smelt like a big wet dog.
As D and I were walking up the stairs to call it a night after sweeping the basement, I wondered out loud how hard it would be to pull up the carpet. "Let's see" said D and within 15 minutes the gross stair covering made of dog hair was history.
  • The weed garden along the front of the house and attempted to tackle the weeds on the right side of the front door. The ground is as hard as cement which makes for back breaking work.
  • The mailbox on the front screen door.

Day Two

  • The front screen door.
  • The ceiling fan on the deck.
  • The leaky kitchen faucet.
  • The leaking pipes under the kitchen sink.
  • The carpet in the basement.
  • The random fence panel in the front yard.
  • Attempted to fix the leaking bathtub faucet (we need to order a new part).
  • The gross discoloured Plexiglas panel above the bathroom counter.


  • And lastly the carpet from the main staircase.....

Those of you who have been paying attention may remember that I posted about our Stairway To Heaven a few weeks ago. The main floor staircase in the house acts as a focal point. It's steep, original and worn from years of use. The risers are high and 80% of the stairs creak underfoot. It  definitely needs to be sanded and re stained in the future but for now I love it just the way it WAS!

For reasons we can't begin to imagine, the previous owner decided to carpet the staircase before we moved in. Please note that this was done AFTER we closed on the house. So the last time we saw the staircase it was happily carpet free.

The weird thing is they went to the trouble and time to do the installation properly. Well as "properly" as everything else in the house has been done. By doing this they have now shortened the timeline in needing to refinish the staircase. They took the time to nail in tacking strips and glue down underlay. They didn't take the time to remove any debris from the stairs before fixing the carpet down though. D found used Xacto blades and strips of staples sitting on top of the underlay under the carpet. Oh Jeez! In all fairness, they may have wanted to carpet the stairs in order to protect them when moving the furniture down but I would imagine using a piece of capeting or blanket would have worked just as well.

So my once beautiful (to me) stairs are now marred with nail holes and glue residue (and the odd missed staple here and there). But at least they are back to being carpet free.

July 3, 2012

I Now Pronounce You Man, Women and House!

We did it! D and I finally bought our very own fixer upper! And boy is it ever a fixer upper....

Our new to us, little dream pad is a 1945 (or so we have been told....this may change once I have had a chance to visit the local archives) 1 1/2 story bungalow with a full unfinished basement that needs a ton of tender loving care. We are raring to jump feet first into this 2300 sq. /ft. renolicious beauty!

Below are a few photos from the MLS listing. The photographer was able to catch the house in some pretty good light and of course only took photos of the rooms that weren't piled with junk.


We don't get possession for another 2 months, so in the meantime we are using the time to devise our plan of attack and visualize the finished product. First items on the list are building a garage and updating the wiring throughout the house which we hope to complete in the 1 month overlap period whilst we are still in our rental.

In the time between getting the house inspected and lifting our subjects, the current owners completed some of the work that needed to be done. The sill plate along the front of the house was rotting away, so they hired a contractor to replace all of the rotten wood and install new cedar siding to match the original siding around the rest of the house. In doing this work all of the bushes and shrubs were taken out from along the front. To be honest it makes the front of the property look a lot neater and not so overgrown. That being said, the lawn is now screaming to be mowed!

If you look closely at the dormer window in the second photo above, you might be able to tell that the flashing had been installed incorrectly when the current owners had the roof replaced about 7 years ago. The flashing was placed over top of the stucco siding and not underneath, as it is meant to be. To our pleasant surprise the owners had this rectified for us as well, along with re-chalking the basement windows.

So for now, we are playing the waiting game, but once we get the keys we will post a lot more before photos for your viewing pleasure! But be sure to check back as there will be more posts regarding house related topics, the joys of packing and other life goodies to keep you entertained until the big day arrives!